Getting Started
Welcome to EasyBind! This guide will walk you through the initial setup process, explaining the project folder structure and how to get your first EasyBind project up and running.
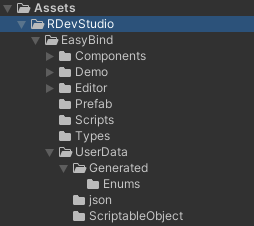
Folder structure
Here's a quick overview of the essential folders in your EasyBind project and their purposes:

Components:
Contains scripts for all components.
Demo:
Includes a demonstration scene along with scripts, offering a practical experience with EasyBind's capabilities.
Editor:
Holds scripts necessary for data, state, and store management
Prefab:
This directory is filled with ready-to-use prefabs that you can effortlessly drag and drop into your scene.
Scripts:
A collection of helper scripts, including the vital EasyBind Singleton script, to assist in various functionalities.
Types:
Specialized types for data obfuscation are stored here, ensuring enhanced security and privacy.
UserData
A critical folder containing auto-generated files essential for the smooth operation of EasyBind. Adhering to the provided guidelines is crucial for maintaining the integrity and flawless functionality of EasyBind.
WARNING
IMPORTANT NOTICE: AUTO-GENERATED CONTENT
This folder contains auto-generated files essential to the EasyBind functionality. To ensure smooth operation and integrity of EasyBind, please adhere to the following guidelines:
Do Not Move: Relocating these files or the folder itself can disrupt the linkage and operational flow of EasyBind, potentially causing critical features to malfunction.
Do Not Modify: Alterations to the contents of these files can lead to unexpected behavior or errors, as these modifications may be overwritten or conflict with EasyBind's automated processes.
Do Not Delete: Removing any files within this folder can interrupt EasyBind functionality, resulting in errors or incomplete operations.
Any changes to this folder's contents can compromise the stability and reliability of EasyBind. If modifications are necessary, please consult the EasyBind documentation or support to ensure compatibility and stability.
RandomData.txt
This file houses the keys for in-memory encryption. It is generated upon the initial build of the store, ensuring each project possesses unique encryption keys.
WARNING
It is imperative to keep this file confidential and not share it with unauthorized individuals.
Modifying this file necessitates resetting the default values of the secured properties, as they are encrypted using the keys previously generated. This step is crucial to maintain the integrity and security of your project's data.
json
This folder houses two JSON files crucial for project configuration:
- FieldDefinitions: This file contains your defined fields definitions
- UIStateNames: Contains the definitions for the UI states.
Demo scene
In the Demo folder under scenes you can explore a demo scene using various components from the EasyBind package.
WARNING
Warning: If you already modified the store and removed the Demo properties the scene will not function anymore. To Make the scene working again make sure the following properies are created within the store.
| Name | Type | Obfuscated |
|---|---|---|
| DemoDropDown | Dropdown_EB | |
| DemoToggle | Bool_EB | |
| DemoSlider | Float_EB | |
| DemoPlayerName | String_EB | False |
| DemoHealth | Int_EB | False |
The DemoDropDown needs at least one option. Demo images are under the Demo/Textures folder.
Add EasyBind in your scene
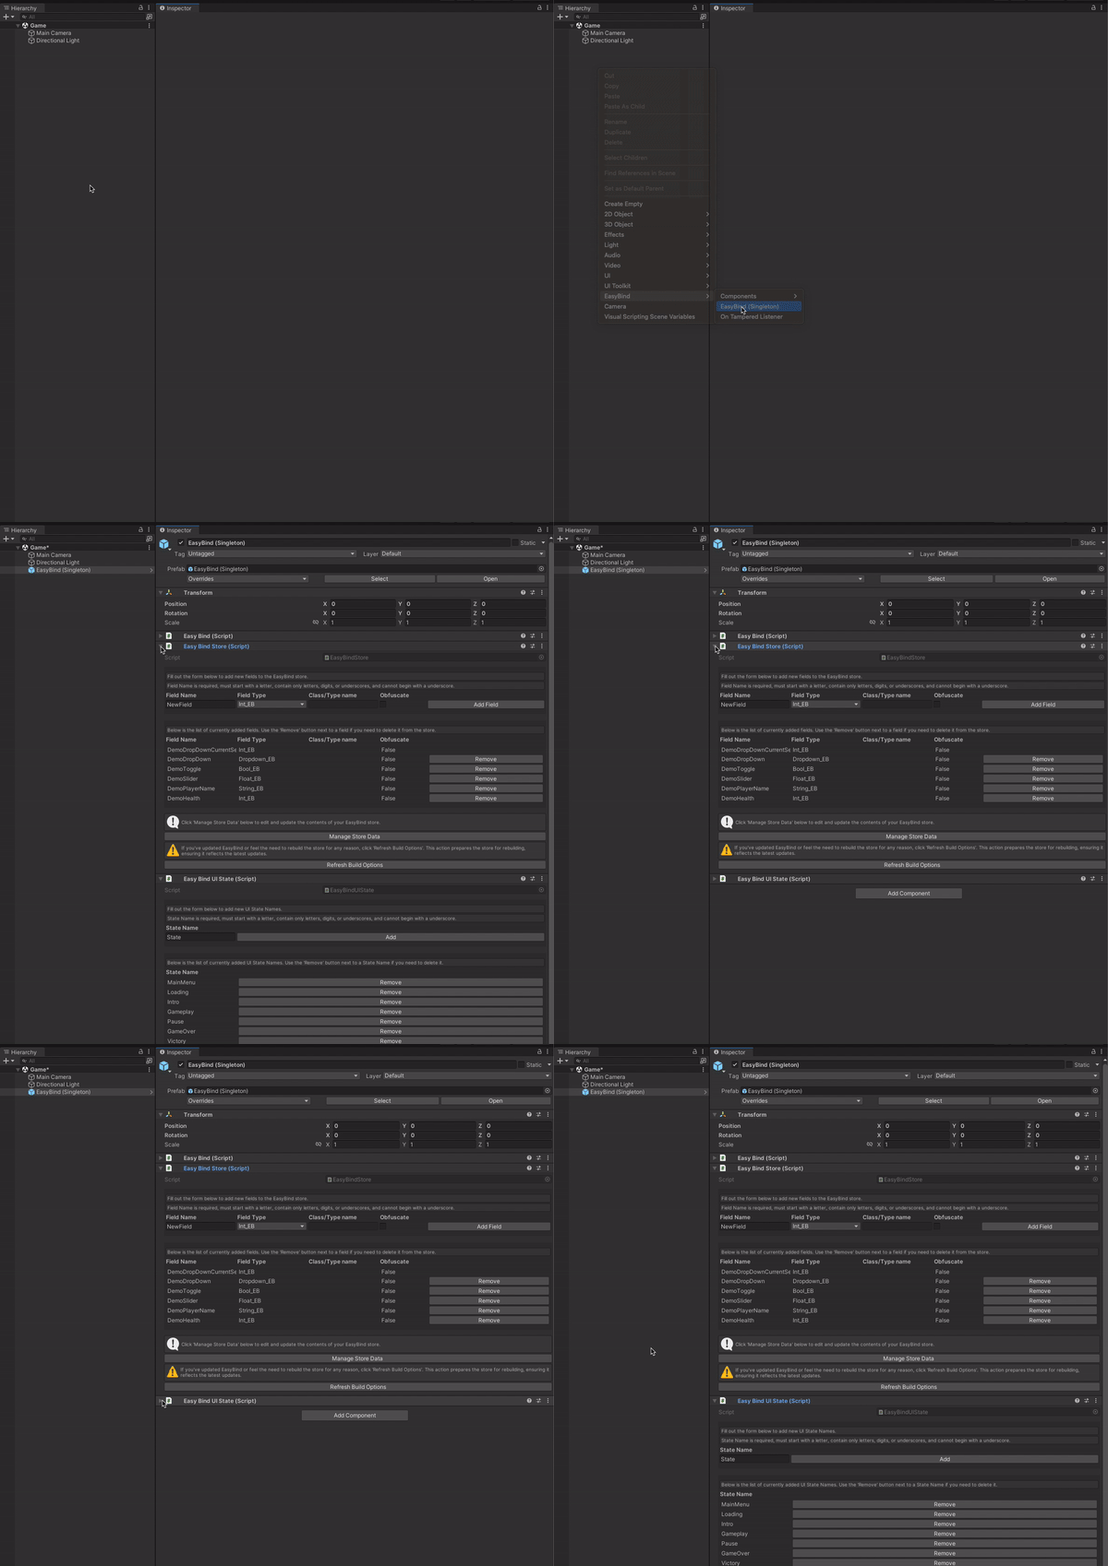
Incorporating EasyBind into your scene requires adding an EasyBind Object. Note: Only one EasyBind Object is allowed per scene. If your project includes multiple scenes each with an EasyBind Object, only the object from the first-loaded scene will persist.

As visible, the EasyBind Object has several components. The two most crucial components are:
- Easy Bind Store: Serves as the backbone for managing data and state within your application, enabling efficient and organized data handling.
- Easy Bind UI State: Essential for managing the user interface's state, ensuring a dynamic and responsive user experience.
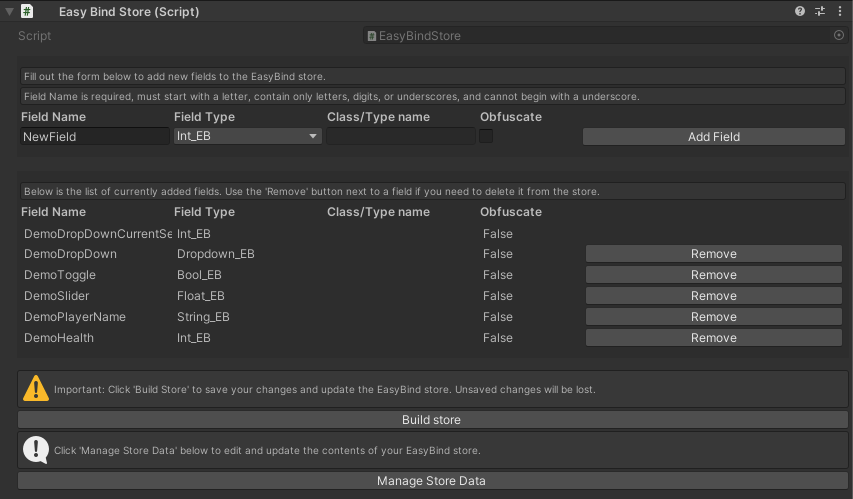
Easy Bind Store inspector overview

At the top, you'll find a form designed for adding new fields to the store.
Centrally located is a list of all defined fields, alongside the capability to remove any field as needed.
Two action buttons are prominently featured:
Build store: This button becomes active once changes are detected. It is crucial to click the Build store button after making any modifications, as it triggers the generation of all necessary underlying scripts, ensuring your store is up-to-date and functional.
Manage Store Data: Clicking this button navigates you to the Data Management screen, where you can assign and adjust values for your properties.
Creating properies

- Assign a unique name to your property, adhering to the naming conventions provided.
- Select the field type from the dropdown menu.
- Depending on the field type, you may need to specify a class/type name or choose to obfuscate the data.
- Click on the Add Field button to create the property.
- Don't forget to hit the Build Store button to update the store with your new property.
Removing properies
To remove a property, simply click on the Remove button next to the property you wish to delete, and remember to press the Build Store button afterwards to apply the changes.
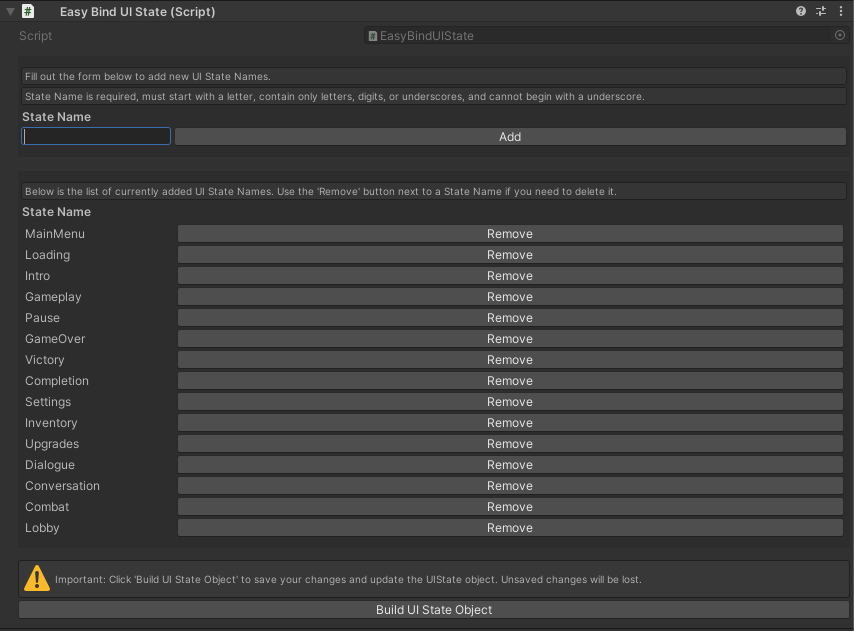
UI Game state

At the interface's top, there is a form dedicated to the creation of custom state names. This tool allows for the personalized naming of UI states, catering to the specific needs of your project.
In the center, a detailed list displays all available state names, complete with an option to remove any state as required. This list ensures you have a clear overview of the existing states and the flexibility to manage them efficiently.
A single action button is provided:
- Build UI State Object: Essential to maintaining the functionality of your UI states, this button must be pressed after any modifications to the state name list. Activating this button initiates the generation of the necessary underlying scripts, ensuring your changes are effectively applied and your project remains up to date.